| Hitler Parody Wiki Tutorials | |
|---|---|
| General | Index · Quick Start · Resources |
| Editors | Caption Generator · Windows Movie Maker · VideoPad · Vegas Pro (Basics · Intermediate) |
| Specifics | Chroma Keying · Rotoscoping |
| Extra | YouTube (Disputing false claims) |
This tutorial will go beyond the bare basics to get a standard parody published as prescribed in the Basics tutorial. This tutorial consists of assorted intermediate-level topics.
Muffled sound effect

Hitler plans a facial plastic surgery
Sounds off

DictatorAntics and the steamed fish
Sounds epicly
You've probably heard this in action - sound effects that make it as if a music is played in the next room, or Hitler gets annoyed by the music playing in the Party Scene. It can be tricky to execute; even the best of Untergangers made mistakes in simulating this effect (too much of an echo, etc). Fret not - here I will show you three Vegas Audio FX plugins that will pull this effect off faster than you can say "epicly" and better than Tukhachevsky would describe it.
- Select the audio event, media or track. If you got a bunch of audio events to apply this effect to, it's better to group them together in a track and apply the FX to the track.
- Open up the Audio Event FX dialog for the aforementioned object (event, media or track). Look for the telltale FX icon (green) and click on it. Alternately, for audio events, you can right-click on it, and a context menu with "Audio Event FX" will be shown.
- The "Audio Event FX" dialog would appear. Depending on which type of object you're trying to apply the FX to, a "Plug-In Chooser" dialog should automatically appear. If it doesn't, look for the green FX icon again in the "Audio Event FX" (top right-hand side corner) and click it.
- In the "Plug-In Chooser" dialog, select the following plugins (or an equivalent) by double-clicking them IN ORDER:
- Reverb
- Equalization
- Resonant Filter
- Click OK on the "Plug-In Chooser" dialog. The three plugins should now appear in your "Audio Event FX" dialog.
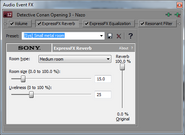
- Set the plugins to these presets (refer to gallery images at the bottom of this section):
- Reverb - Small metal room
- Equalization - Bass boost
- Resonant Filter - Muffler
- The FX should be done! Now play your project and listen to the epic effect!
Framerates
Vegas lets you control the framerate of many stuff - from your project and the preview down to the final render. There are unfortunately also lots of ways to screw up the framerate - especially during the final render. Framerate problems usually arises as a result of using many clips with different framerates.
Here's three important points to keep in mind about framerates in Vegas:
- Checking the framerate of all your source videos
- Adjusting the framerate of your project to best match your source video usage
- Matching the final render framerate to the project framerate
- NOT allowing the source video to 'adjust' (fuck up) the framerate of your rendered video.
Each of these will be discussed below.
- Checking the framerate of all your source videos
- In the "Project Media", right-click on each video and choose "Properties..."
- Take note of the "Timecode". That is the framerate of the source video.
- Adjusting framerate of project

Piret DPA Style
Headpasting with the wrong framerate causes synchronization problems
Normally the default project framerate would do just fine, but adjusting the framerate to the source videos would generally produce better results and optimize rendering.
Note that the best time to do this is before anything is placed in the editing tracks. Changing the project framerate when most of the clips have already been laid out will introduce other complications.
- Open the project properties
- Match the framerate of your project to the one of the source video
- Also, make sure that "Field order" is set to "progressive"
The source video that will determine the project framerate would be the one to be used the most (e.g. the "Hitler Plans Full Scene.wmv" for a Hitler plans parody). If many clips from various sources are used / planned for use (e.g. from Downfall, various other movies and also Internet footages) choose the one with the highest framerate (usually in 29.997 NTSC)
- Matching framerate of final render to project
Make sure to match the render framerate to the project framerate adjusted earlier. Templates that match your project settings are marked with an equal sign ("=") icon.
If the template has the desired video size but not the framerate, click on "Customize Template..." button and pick the desired framerate from the drop-down box.
- NOT allowing the source video to 'adjust' (fuck up) the final render framerate
Sony Vegas had one ill-conceived default setting that let the source videos 'adjust' the framerate of your final render. As a result, your final video could have its framerate reduced to the likes of 14 frames per second (fps) if source clips of various framerates are used in the project. You need to do the following on the "Render" dialog box:
- Pick the desired template
- Click on the "Customize template..." button
- UNCHECK the "Allow source to adjust frame rate" checkbox


